
Creating #AlfredoTheVan
- Cyd

- Feb 22, 2020
- 5 min read
We...ahem, Carter...converted #AlfredoTheVan from boring white van to adventure home ourselves and this post serves as an overview of the process, materials we used, budget, and more!

I am gosh darn proud of my husband who did most of the van conversion while I watched Hallmark Christmas movies and provided "moral support" (e.g. unsolicited management). Before this project, we renovated two kitchens ourselves and promised each other we'd never do that again. But #VanLife was calling our name and we were determined to have fun with this project. So we made a deal: We were only going to work on the van when we were having fun. When we stopped having fun, we stopped working that day.
This mostly worked. We had one "argument" early on and, upon realizing how wasteful it was to argue about a project we already loved, we never did it again. Sure, there were a few times that each of us had "a tone," but in every case, the other would simply mention our rule. And a couple of times we stopped working in that moment. No fun = no van.
The most challenging part of the van conversion process was communicating our intent from an engineering perspective. A lot of scaled drawings and diagrams were created for electrical, plumbing, wall structure, layout, and so on. Carter and I have similar engineering backgrounds (we met in college) and work in the same industry. But we go about our work very differently. While both are important, Carter always starts his thought process from the physical/mechanical perspective, and I start with efficiencies, feasibility, and practicality. In simple words, I make the mechanics of the project work with the desired outcome whereas Carter works towards the "ideal" physical/mechanical state and lets the outcome be what it will be.
For a van, you need both. Things like electrical, plumbing, and overall structure need to be thoroughly planned out keeping physics in mind. But things like layout, ergonomics, design elements, and so on need to be worked into the overall plan because they effect the functionality and aesthetics of the space. Turns out, we work well together on a team. But only a team of 2. Because #HappyWifeHappyLife .....am I right?

General Van Build Thoughts
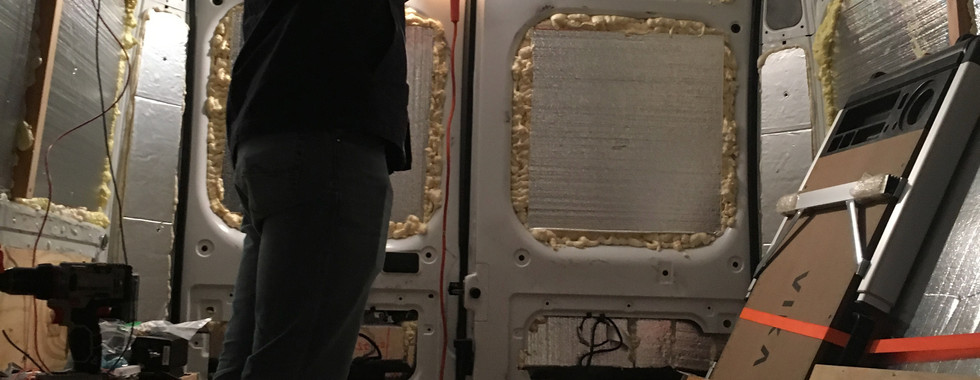
When I look at these pictures, I still think, “I will never insulate a van again...ever...in my whole life.” It’s interesting how people see different things when looking at the same picture. Think about what you focus on when you look at a picture of yourself (side note, this year I am focusing on fostering a positive body image and cheering on my friends as we all crawl through our late 20s feeling very “adult” but somehow still affected by outside opinions as though we are 13 again). Rather than seeing how happy you are and remembering the memory that is captured in an image, you may notice your awkward position or poor lighting.
Looking back at pictures of some van projects (like insulation) causes my blood pressure to raise. Luckily, the majority of the process has me in awe. Mostly in awe of Carter. I can’t believe this van is our home. It has everything we could need to travel this country exploring new places. We put in so many hours to make this right for us. It is not perfect. When my best friend, Melissa, comes to visit in April she will quietly eye a dozen potential changes. She will roll her eyes at the fact that we choose not to do this and that, but ultimately she will be so proud of us. We have her to thank for teaching us a lot of the skills it took to build this van, after all.
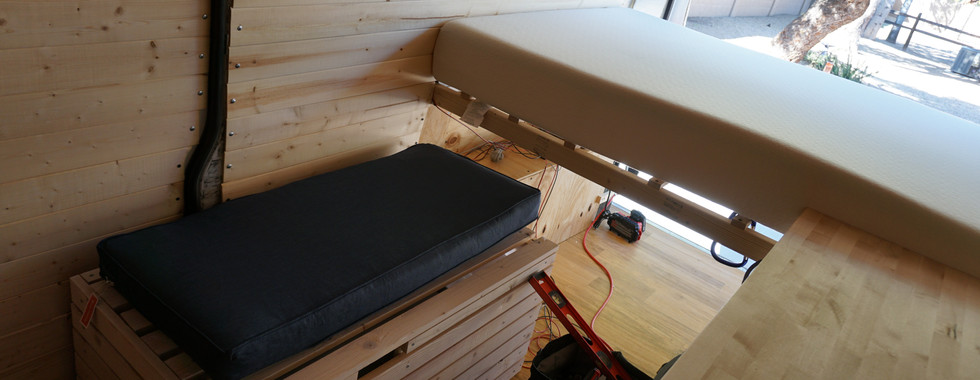
We didn’t take many pictures during the build process because we were so wrapped up in the labor of it all. I wish I could capture the look on our faces when some of the “major” components were complete. The amazement after successfully cutting a giant hole in the van for a window (and again for a vent/fan). The moment the first wire went live and LED lights lit the space. When the sun was finally charging our battery thanks to solar panels. When the bed frame was installed and I laid across it with wood stabbing me in the back because I wanted to “see how it would feel” to lay there and look at the rest of the van. When we put up wall panels (and covered the insulation!!!), walked away for lunch, and came back to realize the incredible difference the finishing touches were making.
The joy we felt creating Alfredo was life-giving. And the joy we continue to to feel now that we are living our current dream is incredible. Thank you, Jesus.
Buying The Van
We bought a 2018 Ram ProMaster 159” WB High Roof van from a small, family-owned operation in our home state. It easily held ALL of our belongings. We bought the van and drove to Arizona for the rebuild. My grandparents have the perfect RV pad where we were able to build the van while getting in some quality time with my family all over AZ. THANK YOU, Grandma & Grandpa for letting us crash your party day in and day out. We already miss you both a TON!
In the middle of west Texas, we caught a flat tire. We needed new tires anyway, so we decided to go ahead and replace them all. We went with a standard tire but will probably upgrade to all-terrain tires next time. That was back in November 2019.

The Build Components
Here's what we started with:
We made a year-long build plan, thinking we would work on it a couple of weekends a month while spending time hiking and visiting with family the other weekends. Turns out, we were able to work on the van, hike, and visit with family every single weekend. It was exhausting, but well worth it. We finished the project in February 2020, nearly 8 months ahead of “schedule”.
Here is the general order of our build:
Floors
Window install
Fan install
Partition wall
Insulation
Solar install
Electrical
Final Van Layout
Bed
Kitchen cabinets/Stove
Wall Paneling
Upper "Closet" Cabinets
Plumbing
Painting/Staining
Garage
“Hacks”
We couldn’t have done this build without three very important sources:
Pictures of the Process
Trivia: How many pictures feature my coffee cup or napping position while the hubby diligently worked?
The “Big” Stuff


Insulation (#UGH) & Electrical Hook Up
Side note: if you wish to experience the misery of insulating a van without, you know, buying a van and converting it, I suggest you try cutting a thick piece of foam with a razor (a thousand times) and/or buying a can of expanding foam and spraying it above your head. Cheap date night idea?


Walls/Paneling


Layout/Kitchen/Plumbing


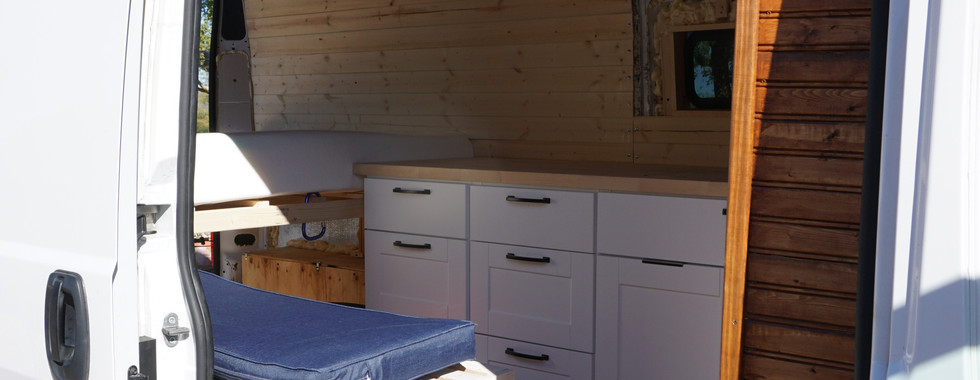


Be sure to check our our Van Overview for the final results!
Budget/Materials
We budged $6k for the build, but ended up closer to $7k. Not too shabby for not having to pay a mortgage!
Here are most of the materials we used:
PS, Ask me how many times we went to Home Depot…ask me…I dare you.... #15MillionPlusMore


Comments